Getting ready for any emergency means having the right tools at hand. A DIY first aid kit is not just a box of band-aids and some antiseptic; it’s your first line of defense in caring for injuries, big or small.
This guide focuses on why being prepared matters—whether you’re at home or adventuring outdoors.
You’ll learn about essential items like wound cleaners and pain relievers, and even how different kits serve different needs from basic to trauma care. Plus, knowing where to keep these kits can make all the difference.
We also cover keeping your first aid kit supplies fresh and ready to use.
Knowing how to use what’s in your kit is as important as having one. That’s why courses from organizations like the American Red Cross are key—they teach you life-saving skills that pair with your kit contents.
With this guide, building a tailored first aid kit becomes easy — step by step, we take through choosing containers like a utility pouch that keeps everything dry and within reach, adding personal items and ensuring medications like insulin are stored right; then moving onto more significant steps such as stocking up wisely by buying in bulk.
Ready? Let’s get started.
Table of Contents
- Considerations When Building Your First Aid Kit
- Essential Components of a DIY First Aid Kit
- Levels of First Aid Kits
- Staged Approach to Survival First Aid
- The Importance of First Aid Training
- Managing Your First Aid Supplies
- How Important is it to Include Urban Survival First Aid Supplies in a DIY Kit?
- Conclusion
Considerations When Building Your First Aid Kit
Think about where you’ll use your first aid kit and what dangers you might face. Also, know which personal items are a must-have for you or your family’s health needs.
Performing a Risk Analysis
Doing a risk analysis means you look at what accidents or health issues could happen in your life. You think about where you live, who will use the kit, and what kind of activities you do.
This helps decide what items your first aid kit needs. If you plan to hike a lot, consider supplies for sprains or bug bites. Live in a city? Consider traffic accidents or breathing problems from pollution.
The details matter here – knowing personal risks like allergies, diabetes, or heart conditions is key. Items like antihistamines for seasonal allergies or sugar sources for low blood sugar are examples of tailoring your kit.
It’s not just about having bandages and antiseptics; it’s making sure your first aid kit fits the specific health risks of its users based on careful thinking ahead.
Identifying Personal Items
Your first aid kit needs items just for you. This means putting in the things you must have, like emergency phone numbers and your meds. If you use insulin, add a cooler case to keep it cool.
Make sure all medicines stay in their original bottles. Always check the dates to see if they’re still good.
Next, let’s talk about what goes into making your own first aid kit..
Essential Components of a DIY First Aid Kit
A DIY first aid kit needs the right stuff to handle minor injuries and health issues. Think of it as your go-to for cuts, scrapes, and more—packed with tools and meds to get you through.
Containers
Choosing the right container for your DIY first aid kit is crucial. The Orca Tactical Molle EMT Utility Pouch is a top pick, thanks to its water-resistant design. This means your supplies stay dry and safe no matter where you take them.
It’s also easy to attach to other gear, making it perfect for emergencies on the go.
Next up, let’s talk about keeping wounds clean with antiseptics.
Antiseptics
Antiseptics like hydrogen peroxide and antiseptic wipes play a key role in any DIY first aid kit. They help treat wounds and keep infections at bay. For those with sensitive skin, Bactine is a gentle alternative that doesn’t sting like hydrogen peroxide might.
It’s crucial to check your supplies every six months. This ensures antiseptics are always ready for emergencies.
Keeping these items stocked helps manage cuts and scrapes effectively. Whether it’s a minor scratch or something more serious, having the right antiseptic on hand can prevent complications from infection.
Make sure you’re prepared by including these essentials in your kit.
Creams and Ointments
After cleaning wounds with antiseptics, creams and ointments are next. They play a big role in healing. Aloe vera gel is great for burns. It soothes the skin quickly. Cortizone lotion helps with bug bites and lowers swelling.
These items stop infections and ease pain.
Keep different types of creams in your kit. Some fight infection, while others reduce itchiness or heal burns faster. Always check dates to make sure they work well when you need them.
Pain Relievers
Pain relievers like aspirin, ibuprofen, and acetaminophen are must-haves. They tackle headaches, fevers, joint pain, and flu symptoms. Keeping these in your first aid kit means quick relief from various discomforts.
Next up—over-the-counter medications play a big role, too.
Over-the-counter Medications
Over-the-counter medications are a must for DIY first aid kits. Include ibuprofen, acetaminophen, and antihistamines to handle pain, fever, and allergies. Shop wisely for these items, focusing on quality and price.
Antacids like Pepto-Bismol can manage indigestion or heartburn. Also consider anti-nausea pills for upset stomachs. These medicines help treat common problems fast. Always check expiration dates and keep your kit updated with fresh supplies.
Bandages and Wraps
After stocking up on over-the-counter medications, it’s essential to add bandages and wraps to your DIY first aid kit. These items are crucial for treating minor injuries like cuts, burns, scrapes, as well as sprains and strains.
You’ll need a variety of them, including adhesive bandages for small wounds, sterile gauze for larger injuries, triangular bandages that can serve multiple purposes, pressure dressings for bleeding control, and athletic tape for support.
Keeping these supplies in check is vital—make sure to restock every six months. Including an aluminum splint provides extra support for broken bones or severe sprains. Remembering the importance of wound care will ensure you’re prepared to handle most situations involving skin damage or musculoskeletal injuries.
Medical Tools
Medical tools are key for handling emergencies. Trauma shears cut through clothing fast, making it easy to see and treat wounds. Safety pins close the fabric and secure the bandages. Nitrile gloves protect against germs during treatment.
Each tool plays a role in quick, safe care during tough situations.
Having the right tools can turn a bad situation better. With items like trauma shears and safety pins on hand, providing immediate help becomes possible. Gloves keep everyone safer from infection.
These essentials ensure readiness for unexpected emergencies, big or small.
Levels of First Aid Kits
First aid kits come in different levels, from basic to trauma kits, each designed for specific needs—keep reading to find out which one fits your situation best.
Basic First Aid Kits
A basic first aid kit is a must-have for quickly dealing with minor injuries. It should include items like band-aids, antiseptics for cleaning wounds, and butterfly closures to keep cuts closed.
Over-the-counter medications such as Tylenol or Advil are key for pain relief. These kits are easy to carry and essential at home or on the go.
Keeping a basic kit means you’re ready to handle small emergencies. Bandages, wraps, and medical tools help with sprains or cuts. Don’t forget an emergency blanket and instant cold compress for sudden injuries or shock.
A well-stocked but simple first aid kit can make a big difference when quick action is needed.
Standard First Aid Kits
Standard first aid kits are ready to buy and come with lots of items. You can find them at different prices, from cheap to very expensive. They have things like containers, antiseptics for cleaning wounds, creams and ointments for skin problems, pain relievers like Motrin or non-aspirin options, bandages and wraps for covering injuries, over-the-counter medications for common sicknesses, and tools like scissors.
It’s key to have one in your home.
Keeping your kit full is important. Check it every six months and replace anything that you used or that has expired. This way, you always stay prepared for natural disasters and other emergencies. Having a standard first aid kit means you’re ready to handle basic health issues safely until professional help can be found if needed.
Expanded First Aid Kits
Expanded First Aid Kits go beyond the basics. They are for serious injuries and can help in big emergencies. Think chest compressions, blood loss, or even a collapsed lung. These kits include items like combat gauze for stopping heavy bleeding, chest seals for puncture wounds, and tools to clear airways.
They also have supplies to deal with major burns or fractures.
After preparing an Expanded First Aid Kit, it’s wise to think about trauma kits next.
Trauma Kits
Moving from expanded kits, trauma kits are next. They have tools for serious injuries. Things like heavy bleeding and deep cuts get quick help. These kits include tourniquets, chest seals, and pressure dressings.
Think of them as first aid for bad accidents before professional help arrives.
Trauma kits also have tools for blocked airways and chest wounds–sucking chest wound gear, to be exact. They’re packed with life-saving items not found in basic or standard kits. For those ready to handle bigger emergencies, these are a must-have.
Staged Approach to Survival First Aid
Building a first aid kit comes in stages, each one fitting different needs. Start small with essentials, then add more as you prepare for everything from minor cuts to big emergencies.
Stage 1: Essentials
Stage 1: Essentials focuses on the basic items every emergency supply kit should have. The goal is to tackle common, minor injuries fast.
- Water-resistant container: Choose one like the Orca Tactical Molle EMT Utility Pouch. It’s tough and keeps everything dry.
- Antiseptics: Wipes or liquid for cleaning cuts and scrapes.
- Bandages and wraps: Various sizes are used to cover wounds or hold dressings in place.
- Pain relievers: Include paracetamol or ibuprofen for quick pain relief.
- Over-the-counter (OTC) medications: For colds, allergies, and stomach issues.
- Personal items: Emergency phone numbers, specific medicines you need, and maybe a cooler case for insulin.
- Medical tools: Scissors to cut bandages and tweezers for splinters.
- Creams and ointments: Anti-itch cream for bites and rashes; antibiotic ointment for infections.
This stage ensures you’re ready for the most common health hiccups without delay.
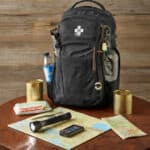
Stage 2: Go-Bags
Stage 2 focuses on Go-Bags for first aid. These bags are ready to grab when you need to move fast. They keep your survival gear and first aid items in one place.
- Choose a durable backpack—It needs to withstand tough conditions.
- Pack light but smart—Include essential medications, such as pain relievers, allergy meds, and activated charcoal for poisonings.
- Add basic wound care supplies—bandages, gauze, and antiseptics for cuts and scrapes.
- Don’t forget personal items—if someone has a specific health condition requiring prescription medications or an EpiPen for allergies, include those.
- Include tools—scissors for cutting bandages, tweezers for removing splinters, and a thermometer.
- Water purification tablets can be life savers—if clean water isn’t available, these help make water safe to drink.
- Copy important documents—have copies of IDs, insurance cards, and emergency contacts.
- Comfort items like lip balm and skin cream can also go a long way in harsh conditions.
- Invest in quality survival gear—a multitool can serve many purposes; add a flashlight and extra batteries too.
Next is Stage 3: House Kit…
Stage 3: House Kit
Stage 3: House Kit is your safety net at home. It turns your house into a preparedness zone for any medical emergency.
- Big Container – Choose a large, durable box or bag. It’s where you keep all first aid items safe and dry.
- Antiseptics – Stock up on items to clean wounds and fight infection.
- Creams and Ointments – Include creams for burns, skin irritations, and allergic reactions.
- Pain Relievers – Have medicines for headaches, muscle pains, and fever.
- Over-the-counter Medications – Add remedies for tummy bugs, allergies, and cold symptoms.
- Bandages and Wraps – Gather different sizes for cuts, sprains, or fractures.
- Medical Tools – Keep scissors, tweezers, a thermometer, and a manual blood pressure cuff.
- CPR Supplies – Add masks for artificial ventilation during cardiopulmonary resuscitation (CPR).
- Emergency Numbers List – Jot down numbers for the poison center, hospitals, and family doctors.
- Allergy Details – Write out food allergies and other allergens that affect family members.
- Training Manuals – Include first aid training manuals or guides on emergency care techniques.
- Multiples of Each Item – Have more than one of the most important items in case you run out.
This kit is your go-to during emergencies before professional help arrives. It makes sure you are ready to handle anything from minor cuts to bigger health scares at home with confidence and calmness.
Stage 4: Bulk Supplies and Equipment
After setting up your house kit, it’s time to think big. Stage 4 is all about stocking up on bulk supplies and equipment. This stage focuses on how to start prepping for long-term situations. Here’s why it’s smart to buy things in large amounts and what you need:
- Cost Savings: Buying in bulk saves money. You get more for less.
- Multiple Kits: Create several emergency kits without breaking the bank.
- Training Materials: Use some supplies for practice, knowing you have plenty.
- Medical Gloves: Keep lots of these to protect against germs.
- Antiseptics: Have big bottles for cleaning wounds.
- Bandages and Wraps: Stock different sizes for small cuts or bigger injuries.
- Pain Relievers: Buy large packs of tablets to help with pain anytime.
- OTC Medications: Get medicines for fever, colds, and allergies in bulk.
- Gauze Pads: Useful for bigger wounds, so have a good supply.
- Tweezers and Scissors: Essential tools for dealing with injuries or making smaller bandages from larger pieces.
- Blood Pressure Cuff and Stethoscope: Critical if someone needs long-term care or monitoring.
Remember, having extra lets you train without using the supplies you might need one day. Practicing is key to being ready. So, keep your first aid skills sharp by using some of your bulk items for drills and training sessions.
The Importance of First Aid Training
Having a first aid kit is great, but knowing how to use it matters even more. Think about it – in an emergency, like a heart attack or serious cut, quick and right action can save lives.
That’s why learning CPR, how to use an AED (Automated External Defibrillator), and basic first aid skills are critical. Groups like the American Heart Association and Red Cross offer training that could make you someone’s hero someday.
Also, practicing with your first aid kit isn’t just helpful; it’s necessary. It helps you act fast during real emergencies. Knowing when to call for an ambulance or head to the hospital is part of this training, too.
In situations such as cardiac arrest or severe allergic reactions, seconds count – being prepared can be the difference between life and death.
Managing Your First Aid Supplies
Keep your first aid supplies in check by training. Learn from the American Heart Association or Red Cross how to use CPR, AED, and First Aid properly. This knowledge is key for using your items correctly.
Practice makes perfect — get comfortable with what’s in your kit. Use it like you know it; confidence here can save lives.
Spread out multiple kits across different spots — home, car, work. This ensures you’re always ready no matter where an emergency hits. Check dates on items regularly and replace any used or outdated supplies quicklyJ.
Staying prepared means staying ahead of emergencies before they happen.
How Important is it to Include Urban Survival First Aid Supplies in a DIY Kit?
In an urban environment, having essential skills for urban survival and including urban survival first aid supplies in a DIY kit is crucial. From minor injuries to more serious situations, having the right supplies can make a big difference in managing emergencies until help arrives.
Conclusion
Creating your own first aid kit is smart. You now know how to pick items and organize them. Training on how to use the kit makes you ready for emergencies. Keep kits in different places so you’re always prepared.
Check and restock your supplies every six months – safety is ongoing, not a one-time task.











Leave a Reply